

Back to the Basics
A common situation educators must navigate is how to find the most appropriate exercise packet for a group of students or performing ensemble. There is trend these days towards more of a performance mindset even in the warm-up arc, which is not necessarily a bad thing. However, with that comes some hurdles - and unfortunately can lead some poor decisions by instructors, especially for younger or inexperienced groups.
Much like the wheel, there are some things we just got right the first time - they don’t need to or simply can’t improve much on them. Ever notice that a lot of veteran educators teach in a similar fashion? That the “higher” you go in the marching percussion activity the less differences you find? Why is that?
Basics. Fundamentals. It is a classic young educator mistake to try and re-invent the basic techniques. That is not to say there are not effective ways to teach these skills as a young educator, just that there are not really any new "hot takes” on them. So where do you start?
Keep it simple. A simple exercise program allows for much quicker production and application of basic skills, as well as a customizable approach to any show music scenarios. Too often, educators may invest in a long and complicated exercise packet to attempt a cool vibe in the lot. While that might work for the a top tier DCI battery section, it is generally a failure waiting to happen almost anywhere else - especially at a high school level.
For young and/or inexperienced performers, exercises should be meant to reinforce basic skills: technique, sound quality, listening, etc. and to activate the needed muscle groups before they are needed in the performance environment - much like starting your car a few minutes early in the winter to let things (literally) warm up.
Ask yourself, “do we need to break down the skills within this exercise? Do we need an exercise to work on the exercise?” If so, you may have over-engineered your exercise packet. Leave the theatrics for the “pros” - Steph Curry can warm up with half court shots, but the JV team should stick with layups and fundamentals.
With that in mind, what are some skills sets and/or muscle groups to warm up? Here’s a good list to start from.
Legatos:
Why its important: This is a great exercise to start warming up the larger muscle groups in the forearms/wrists. It allows the player to stretch those muscles in a low intensity environment, and also establish/reinforce the basic protocols of rehearsal (mark time, sticks in/out, etc.). The basic nature of both the motion and rhythms makes this a great warm up to begin with.

You can play the entire exercise at any given dynamic level to continue to work on wrist turn and listening.
With Dynamics

Tenor/Bass Variations

Listen for:
Rhythmic integrity - strong 8th note pulse. You can be strict with the rhythmic interpretation because of how simple it is. This is an easy skill to place almost perfectly regardless of the experience or age level of the ensemble.
Balance - All players should be producing the same volume throughout. This is most exposed through the variations with dynamics and can be used to increase a player’s awareness of their volume contribution compared to the person next to them.
Sound Quality - Match the proper playing zones, velocity contribution, and implement grip. A tighter grip can result in a shorter and choked off sound of the instrument, and is a common error for young players at a higher tempo where they have not built the appropriate muscles to move the sticks that fast yet.
Look for:
Strong sticks out for subdivision, including the prep starting and moving together.
Upstroke speed should match - generally within about a quarter note is good; it does not need to be defined in any more detail (but can to your preference).
Fluid motion between strokes. Too tight of a grip on the sticks will result in a separated or disconnected motion. Too loose of a grip can result in a violent upstroke that is too fast and uncontrollable.
Feedback to the players is vital. Make sure to provide information to set the standards, expectations, and to match their individual perception with reality. Players need to know the sensations to reproduce. Look out for bad technique - players can achieve a decent sound on such a simple exercise with many variations and bad technique. This can set up bad habits that won’t show themselves until much later!
Accent Tap
Why its important: Playing this after legatos results in a cumulative effect - the skills build on each other! This expands on the sound quality and adds one additional technique to the established Legatos approach.

Quads can move the accents as written or play on 1 drum to establish the technique. Don’t be afraid to match the sound on one drum before moving!
Variation 1

Variation 2
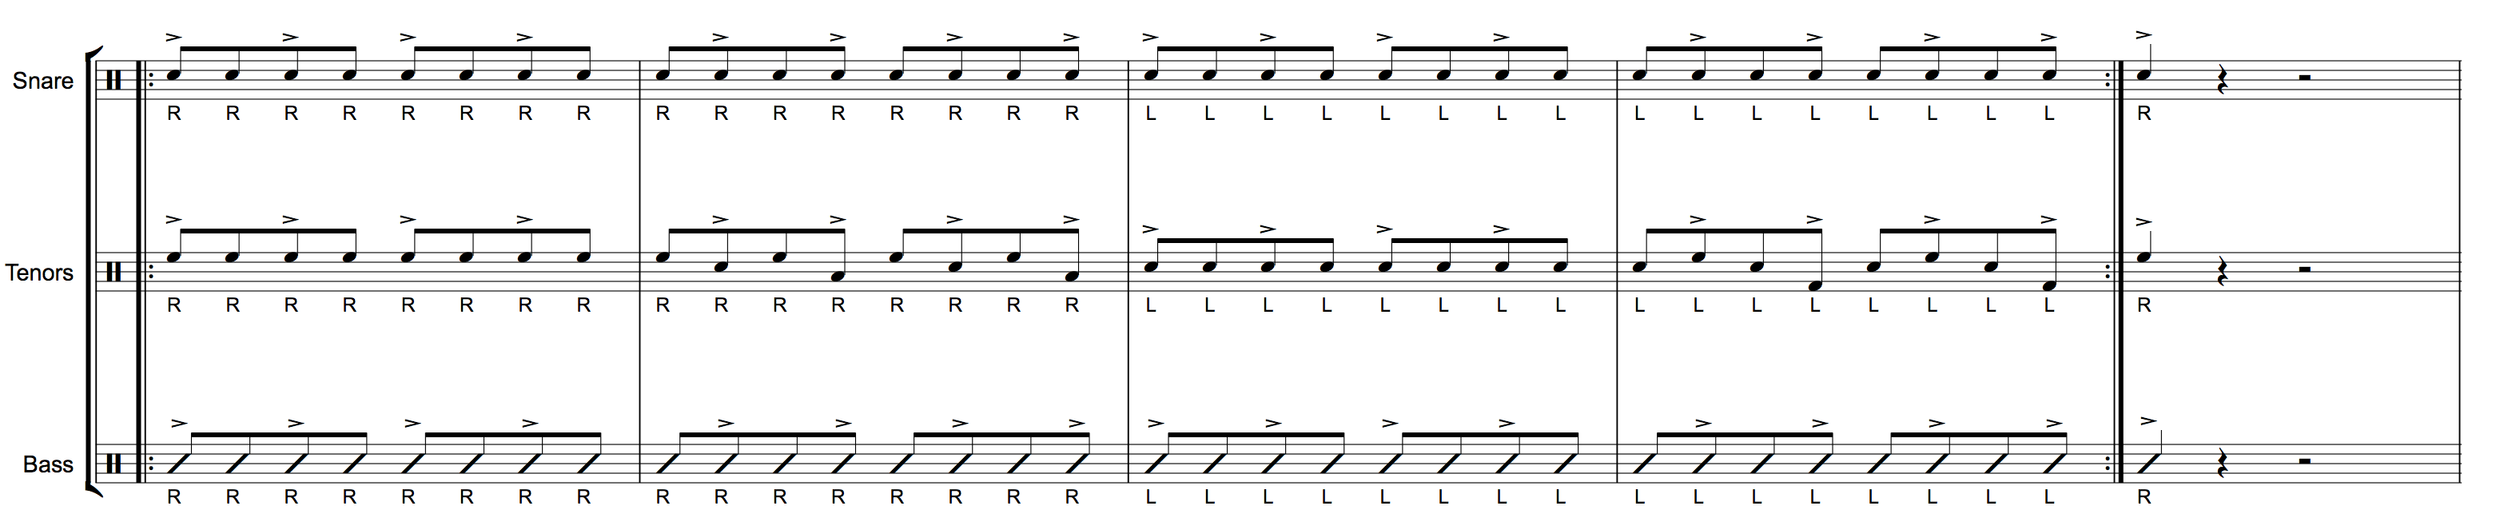
Variation 3

Experiment with each section playing a different variation at the same time - this can work on listening as well as consistent sound!
Listen for:
Attack and Accent sound quality. A common error is players “slamming” the accents/attack. The accent sound should be the same quality and volume as a high legato stroke.
2nd note quality. If the tap after the accent is very weak or comes in early, there is a good change the player is squeezing the stick too tightly, or striking the drum with too much velocity on the prior accent.
Tap sound quality. The taps should still have a full sound, just a lower volume. Common issues here are underplaying and/or over squeezing the sticks. This is usually compensation for trying to stop the stick by gripping tighter after the accent. Scratchy taps can affect the following accent. It is more than getting the appropriate height difference - the sound quality control between dynamic levels is important!
Look for:
Upstroke motion. A common motion error is a late/fast upstroke. This motion is hard to control a can result in a “pound” on the accent, leading to a hard to control tap. In context, after a tap the upstroke should happen as soon as possible, so you have a calm and (relatively) slow upstroke. Remember - “slow up, fast down.”
Hand shape. The hand should stay in mostly the same shape throughout the exercise. The torque of the upstroke may pull the fingers open/away from the palm. The student should keep a low amount of grip/resistance on the stick to avoid letting the fingers open too far. With the “slow up, fast down” approach and a sooner and slower upstroke, this will be easier to control.
Grip changes. After the accent, the fingers should also account for the torque of the rebound. Look out for open fingers on the down stroke - the rebound will be much more difficult to stop if the fingers are open on the down stroke as well. Additionally, the weight of the hand should stay on top of the stick. This combination will use the weight to stop the front of the stick from rebounding, and the consistency of the grip in the fingers will stop the back of the hand from opening as well.
Slow Diddles (Gallop)
Why its important: This is the first exercise yet that really involves the fingers/small muscle groups in a larger capacity. This is great for building up a long and full sustained sound for slower rhythms. Slow Diddles feels the most “appropriate” at moderate to fast tempos - too slow results in the player having to control the individual notes a little too much, and too fast results in more of a diddle feel with pressure changes.
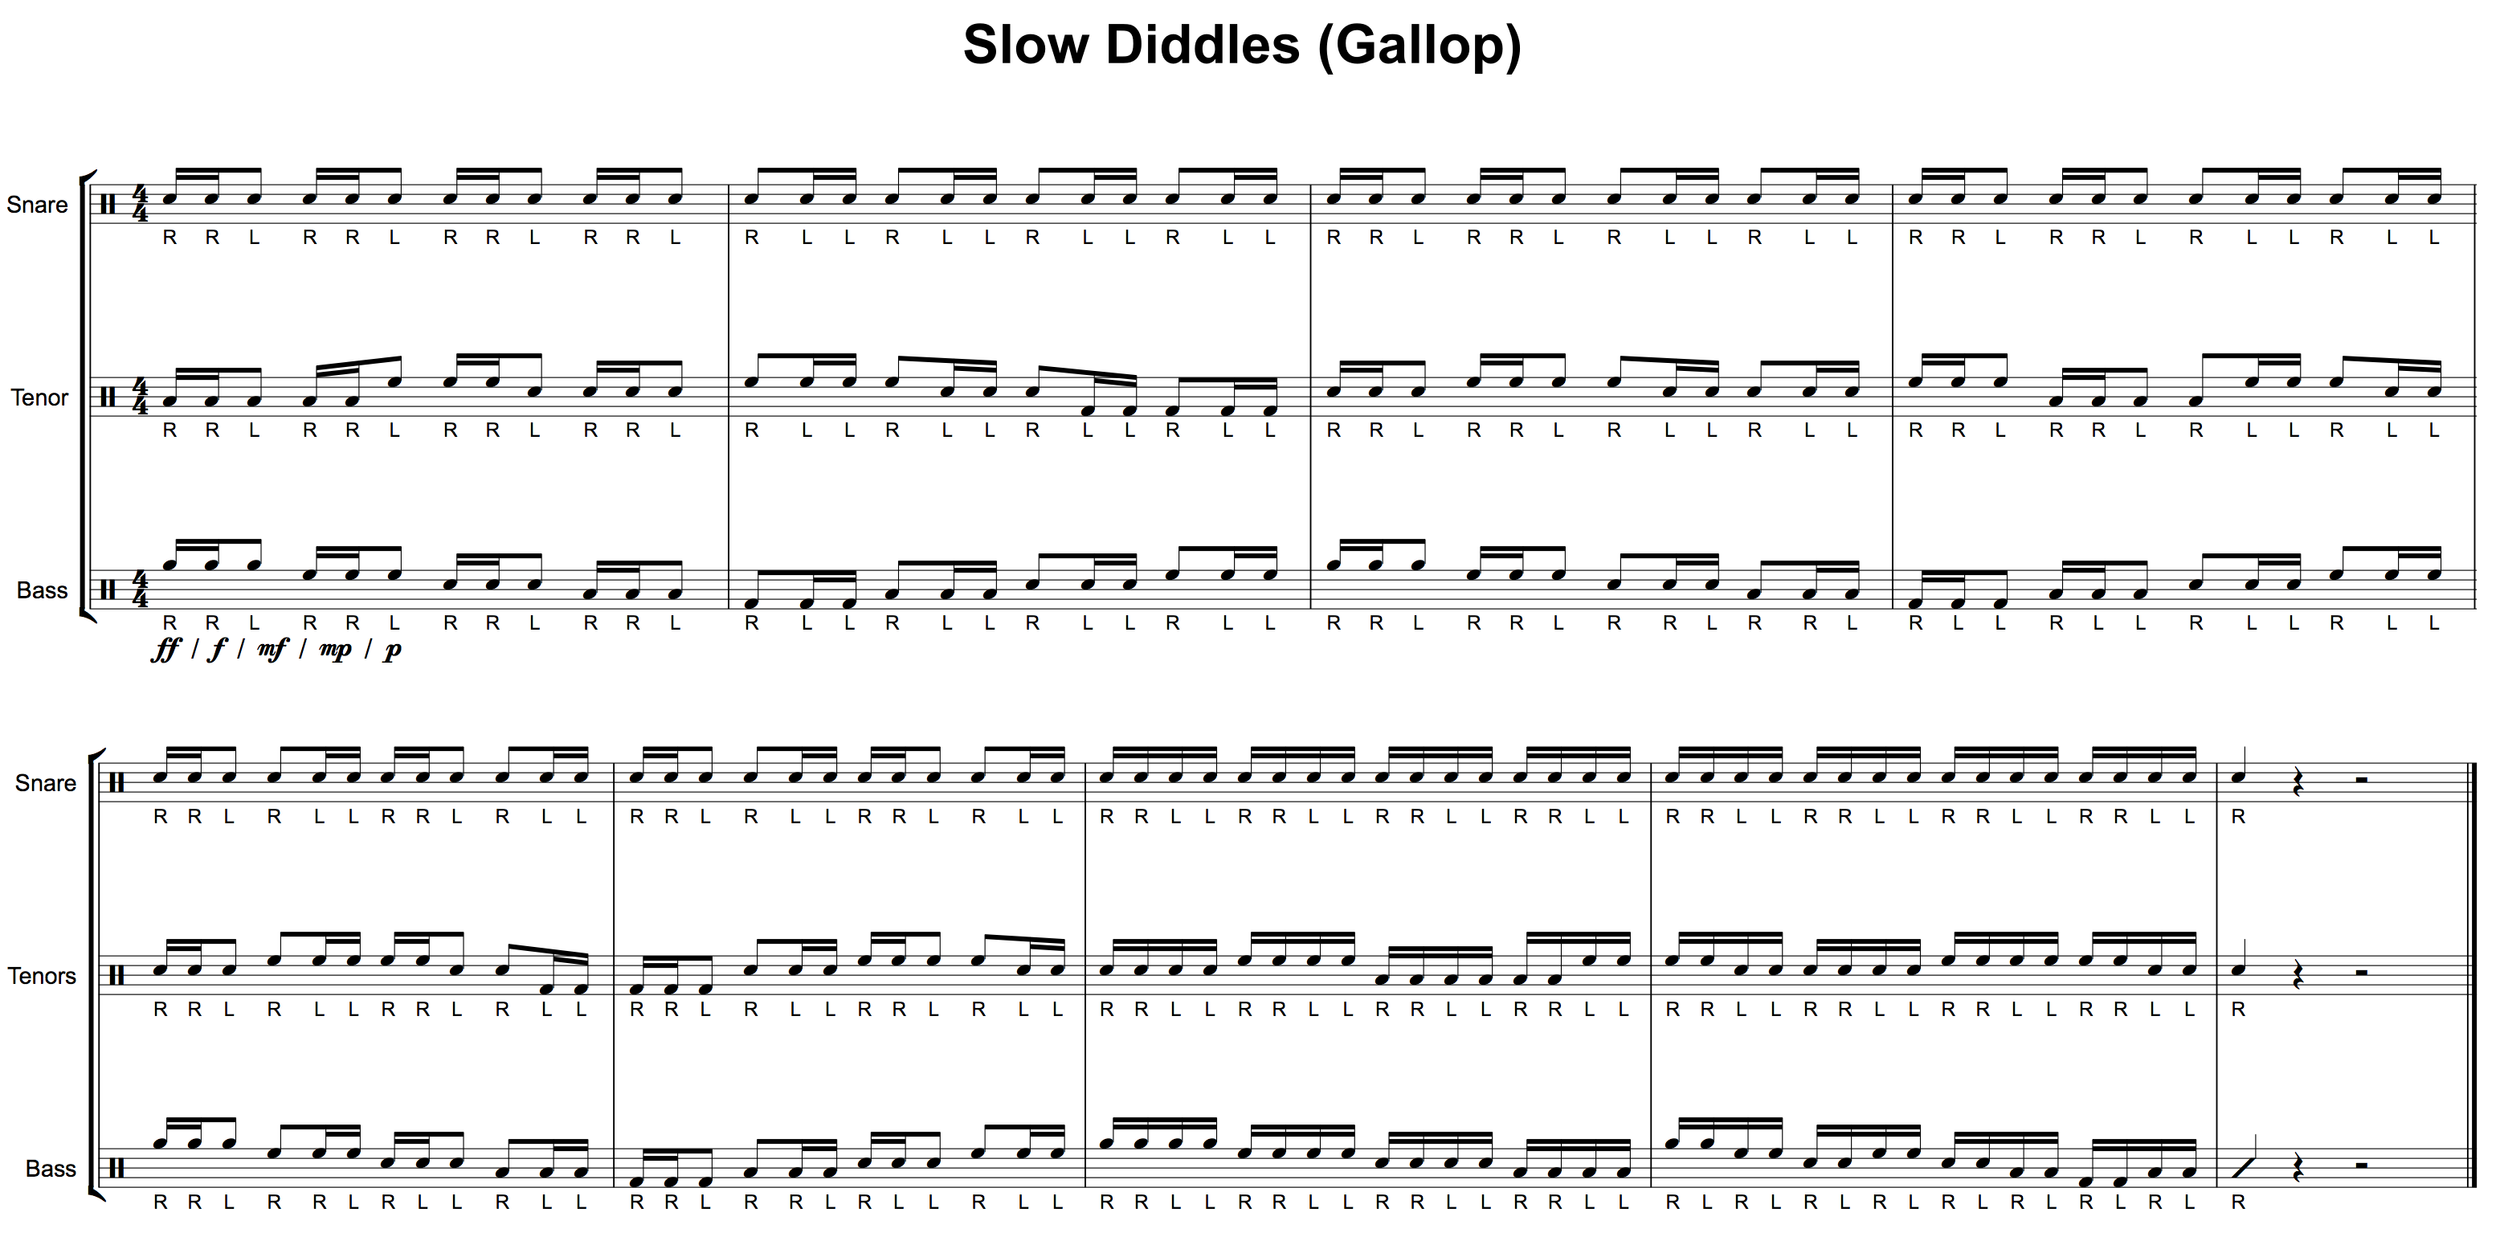
Use the same dynamic variations as Legatos! Quads and Basses can also play this unison before doing any splits.
Listen for:
Attack volume. The first note should be at the same volume as the following notes.
2nd note (of the diddle) volume. Over-striking the drum on the first note can make the rebound almost impossible to control, so the 2nd note will be substantially softer. This may also be a symptom of weak fingers, or using exclusively the wrist or fingers to achieve the 2nd note of the diddle.
Rhythmic integrity. The hands are playing double the speed they are moving. Make sure the “check” or “macro” rhythm is lined up, and listen for the “micro” rhythm to line up from there. Remember, early/late and fast/slow are not interchangeable.
Look for:
Hand shape. The finger involvement for this specific skill set should still be well within the grip that has already been established by the previous two exercises. Many weaker wrist muscles will compensate by increasing the finger use, which causes the hand to become noticeably more open.
Fluid “macro” motion. The big motion of the sticks and forearms should be relatively fluid throughout. Any rigidity or stiff motions are likely the result of squeezing the stick and/or tensing the back of the hand.
Rolls
Why its important: This is the next level of small muscle group usage that also incorporates pressure into the stick. You can build here on the principles of micro vs. macro motion, but the controlling muscle group changes slightly. Rolls feel the best at higher tempos - if the tempo is too slow the player may need to use more of the Slow Diddle muscle groups to achieve the same rhythm as opposed to using the pressure in the fulcrum.

This pattern works on isolated diddles, one hand at a time.
Rolls/Tap Rolls Variation

Bass/Quad variations optional. Unison reps are great too!
Listen for:
Consistent volume. The pressure change on the stick should not change the volume or heights.
Full check sound. The notes behind the check should share a full sound quality with good zones!
Macro rhythm accuracy. Adding pressure will always result in a reduction of the rebound and cause the “check” rhythm to fall out of time. Make sure the underlying rhythms don’t change!
Micro rhythm accuracy. The diddles should be splitting the check directly in half - adding pressure too early or late, or adding too much/too little pressure can all affect the 2nd note placement. Like Slow Diddles, fast/slow does not equal early/late. Diddles too closed? Less pressure is the fix. Diddles too open? More pressure is the fix. (Generally).
2nd note quality. If the 2nd note of a diddle has a change in the sound quality, it is likely an error with the first note. Make sure the player is not over squeezing the entire stick (instead of just the fulcrum) and that there is no added pressure on top of the stick pushing towards the ground.
Consistent sound quality. The check and rolls should both have the same sound quality. A common error is getting too light/relaxed on the check, which results in a change in the hands for the roll. Pay attention to the zones of both notes! Bad zone placement can drastically change the sound.
Look for:
Consistent hand shape. You may be sensing a theme here! This skill is generally too fast to try and “stroke out” each note. Choppy fingers will be visible, and the pressure change should only happen inside the grip at the fulcrum.
Fluid motion (throughout). The macro motion here also does not change (like in slow diddles). Watch for any drastic change in the motion of the beads/hands. Note: At faster tempos, the arms will be more involved with the rolls. That is OK! You need the support/weight to get the 2nd note!
Stick angle consistency. Another common error is raising/lowering the wrist when initiating pressure.This changes the angle of the stick/bead and can greatly affect the rebound and sound quality.
Flams
Why its important: Flams can be a culmination of all the previous skills. Mixed with pressure changes for hybrid rudiments, this can be a great way to activate your entire skill set without the full challenge of a show setting. Set your metronome to the 8th note due to the mixed meter!

Snares and Basses can play unison here, thought flams are not written often in Bass parts.
There are 2 variations for the quads to incorporate some additional motion.
The 8th notes and/or the Flam Accent groupings can be substituted for other rudiments. Here are some basic variations:
Flam Taps

Flam Paradiddles

Flam Stutters (“Cheese”)

Flam Drag

These are only a few examples. There are endless possibilities and combinations of rudiments to challenge the hands and the brains, but it is recommended to start small - set the foundation before worrying about the complicated stuff!
Listen for:
Flam spacing. The grace note should be “on the grid” and a relatively tight flam. This is a controversial interpretation, but that is by far the easiest way to control the space. The grace note hand and taps can then be a consistent rhythm. If you aren’t convinced, play consecutive Flam Accents without the Accent while using a metronome. You will likely notice very quickly that the grace note is “on the grid” and in sync with the met for you be able to keep a consistent hand motion.
Tap consistency. The low notes should be the most important sound here. Grace notes and taps should be the same volume and sound quality. This differs with the concert percussion approach to this very skill, and that is OK! Remember, you are lining up this sound between multiple people in a battery section, not a single snare drummer behind an orchestra.
Rhythmic integrity. The flam spacing may create a distortion in the written rhythm. The rhythm should be the same with or without the grace notes creating the flams.
Look for:
Similar to accent tap, watch for chaotic/violent up strokes. For younger and/or inexperienced players the accent hand may be delayed in the up stroke to compensate for the coordination needed, which can cause a lot of issues.
Grace note initiation. This should be identical to a tap initiation. A common error is to lift the stick without rotation and/or simply have taps that are too high.
A “clean” look. Precision in the up and down motion can be a big advantage. The accents of the flams should be the only thing that interrupts the flow/stream of taps. This means the sticks should stay relatively “down” and the accents be easy to distinguish. A good analogy is to imagine if you were watching the group play on a screen with no sound you want to be able to still write out what you can see them playing.
Final Thoughts
There are an almost infinite number of other things to listen and look for, but this should serve as a place to start. Like a doctor, you must diagnose the most common issues and try the most common solutions before digging deeper. Not everything requires you to be Dr. House, and many of these small adjustments make a huge difference over time. The goal is that the skills the players are working on should be building on each other throughout, and then can easily translate into a show environment.
Additionally, these skills are somewhat universal, meaning they can be utilized for any multitude of show/performance scenarios. This is especially useful for high school groups with a high turnover rate, and to build a consistent base of skills as a foundation for a young program.
If you want to have a challenging etude to work on outside of the standard exercise program, have at it! It can be a great way to have challenging music to play that does not have the same weight of your performance material. You know your program better than anyone, so take this information with as much weight as you prefer. There are many roads that lead to the same place of success, and this approach is only one. It has, however, served as a shorter road time, and time again.
Want more information? Contact us!